Explore Acumatica, Use Acumatica
Can Acumatica email invoices? (Yes)
Can Acumatica email invoices to my customers?
Yes. Acumatica can email invoices to your customers. All the logic is embedded within the product. With other ERP platforms, you’d have to purchase automation software. But with Acumatica, it’s all baked in. So everything you need in these examples are included. Here are the many ways Acumatica can handle this for you.
So can Acumatica email invoices one at a time, whenever customers want an additional copy?
Yes. Just call up the Invoice, and choose Actions > Email Invoice/Memo.
Bingo.
Wait, Can Acumatica email invoices to all my customers at once?
Yes. Acumatica can send invoices, order confirmations and statements by email. And it does it without using any third-party applications.
These settings are controlled via several default configuration options:
- Customer Class defaults
- “Send From” Email address default
- Email message template
Customer Class Configuration
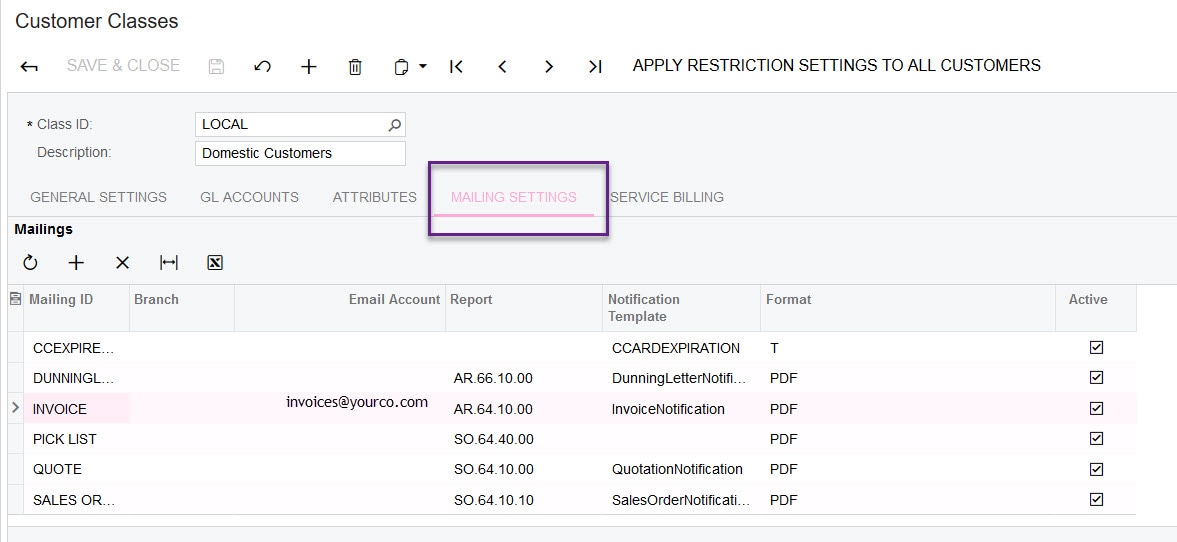
Start by creating the default mailing settings for your customers at the Customer Classes (AR201000) form. All customers created as part of this class will inherit these values. Therefore, ef you have multiple customer classes, configure the mailing settings for each of them.
So – how can Acumatica email invoices? Easy- tick the “Send Invoices by Email” checkbox!
Sending Invoices From the Right Email Account
You’ll also define some specifics on the “Mailing Settings” tab. By default, there are multiple kinds of mailings configured in the system that you can edit. In our example, we’ll look at the Mailing ID of “INVOICE” that is pre-configured. You may want to define the “Email Account” as shown below. That way, the invoices come from an email address that is right for your company. Notice the “Notification Template” as well. We will edit that in the next step.
If a specific customer needs to have settings that deviate from the default ones you just defined, that works too. Just use the customer’s Mailing Settings tab on the Customer Profile form (AR303000). When you modify the mailing settings for those customers, the settings are flagged as overridden.
Editing the Notification Template
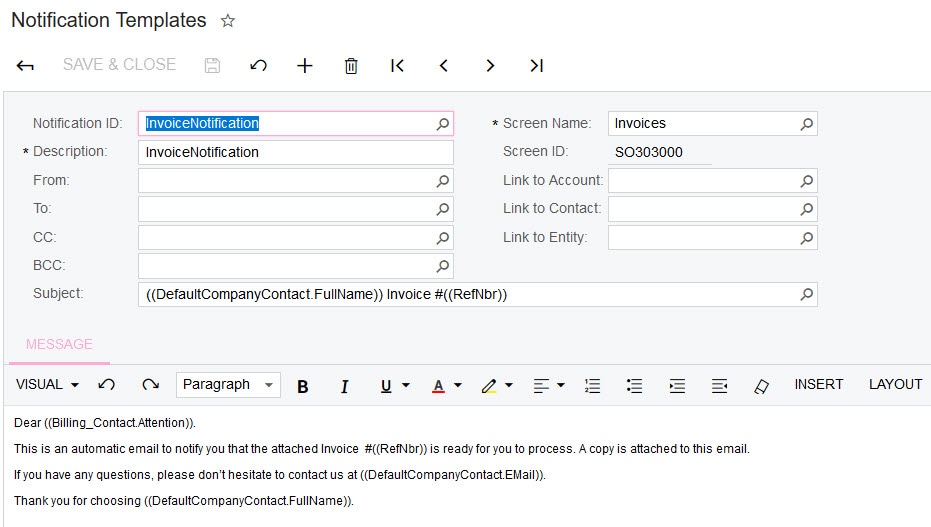
To make sure the Invoice email matches your company’s style, edit the Notification Template (SM204003) for Invoices. Search for the “Invoice Notification”, and edit & save.
Sending Invoices
Great. It’s time to send those invoices. Navigate to the “Print Invoices/Memos” Screen (AR508000). Change the Action to “Email Invoice/Memo.” In the list, by default you will see all the un-emailed invoices and memos. As long as the “Don’t Email” checkbox is blank, then it’s eligible for sending.
To process all the invoices at once, click “Process All”. Here’s what a completed screen looks like:
Depending on the Email sending/receiving schedules you have established, the Invoices will be emailed at the next scheduled time.
By default, the system doesn’t perform the actual sending of the emails right away. Prepared emails are gathered in the queue shown on the Emails Pending Processing form.
If you want to trigger them now, go to “Emails Pending Processing” (SM507000) and process them.
Can Acumatica Send Invoices on a Schedule, Without Me Doing Anything?
Yes, Acumatica can do this too. All you have to do is automate the process above.
Automate the Email Invoice/Memo action
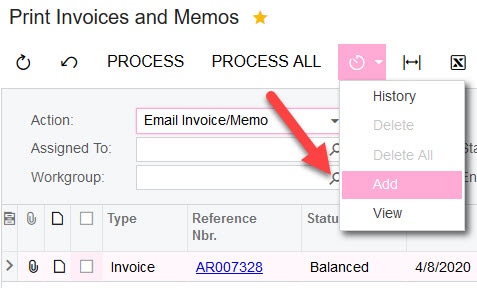
On the “Print Invoices/Memos” Screen (AR508000), you may choose “Add” to add a schedule:
This schedule handles the “Print Invoices and Memos” screen actions.
Here you may define the schedule you want, and it will automatically process the invoices that are in the queue for sending. Note: the “execution limit” defaults to a value of 1, which means it will only fire the schedule once. It’s likely that you’ll want to change this to “No Execution Limit”
Once you define this schedule, it processes the request to Email Invoices and Memos. Then it sends those emails to the ‘Emails Pending Processing’ Queue. So your next step is to automate that part, if you want.
Automate the Sending Email action
On the Emails Pending Processing Screen (SM507000) you should now see your queued invoices. Follow the same steps as above to click the timer icon at the top, and choose “Add” to add a schedule.
Add your schedule for Emails Pending Processing, and now you’ve fully automated the process.


